Archive

Archive for the ‘Application’ Category

How Syteline handles multi-currency transactions

January 16th, 2011 No comments

General Concept:

  • Customer amounts will be stored in the customer’s currency. This effects CO, Estimating, and AR.
  • Vendor amounts will be stored in the vendor’s currency. This effects PO and AP.
  • Cash accounts in Bank Reconciliation may be stated in non-domestic currencies. When receiving customer payments or making vendor payments we may specify the payment with either domestic currency or the customer/vendor currency.
  • All journal. Ledger, inventory ( price & cost) and shop floor amounts are always stated in domestic currency.

NOTE: Therefore when amounts are posted into journals they are translated.

PO & AP:

  • Gain/Loss – When exchange rates increase over time (foreign currency per one unit of domestic currency), we record a gain and when exchange rates decrease, we record a loss.
  • Entry – PO header & line/release casts are entered and stored in the vendor’s currency. Whenever these amounts are defaulted from the Item master, they are converted using the current exchange rate.
  • Receiving – At receiving time, we record the amount received, cost, and exchange rate. We post domestic amounts to the journal using this exchange rate.

Account Numbers Posted (PO Dist):

  • Debit- Inventory account
  • Credit- Vouchers Payable

Generating Voucher (PO) & Posting Vouchers (AP) – When we create the voucher record, we store any change in exchange rate from Receiving time to voucher generation time as a distribution. The voucher is stored in the Vendor’s currency. When the Voucher is Posted, domestic amounts are posted to the journal and vendor amounts are put on the Posted Transactions record along with the exchange rate that was used for posting.

Account Numbers Posted (AP Dist):

  • Credit – Accounts Payable
  • Debit- Vouchers payable

Payment – Payments may be entered in either Domestic Amount or Vendor’s amount based upon the currency code of the Bank Code you select for the payment. When the payment is posted, domestic amounts get posted to the journal, and vendor amounts are put on the Posted Transaction record. At payment posting time, we perform a mini-gain/loss for the voucher and any payments or adjustments to that voucher. All of the Posted transactions tied to the voucher will be “upgraded” to the new exchange rate
Account Numbers Posted (AP Dist):

  • Credit – Cash account (Payment Amt @ new rate)
  • Debit – Accounts Payable (Voucher Amt @ old rate)

Voucher’s Gain/Loss posted to either Loss (Debit) or Gain (Credit)

CO & AR:

  • Gain/Loss- When exchange rates decrease over time ( foreign currency per one unit of domestic currency), we record a gain and when exchange rates increase, we record a loss.
  • Entry- CO header and line prices are entered and stored in the customer’s currency. Whenever these
    amounts are defaulted from the item master, they re converted using the current exchange rate.
  • Shipping- At shipping time, we record the amount shipped, price, and exchange rate. We post domestic amounts to the journal using this exchange rate.

Account Numbers Posted (CO Dist):

  • Debit – Cost of Good Sold
  • Credit – Inventory

Invoice Printing (CO) Posting (AR) – When we create the invoice record, we store any change in exchange rate from Shipping time to invoice printing time as a distribution. The invoice is stored in the Customer’s currency. When the Invoice is Posted, domestic amounts are posted to the journal and customer amounts are put on the Posted Transaction record along with the exchange rate that was used for posting.

Account Numbers Posted (AR Dist):

  • Credit – Sales (Invoice @ Old rate)
  • Debit – Accounts Receivable (Invoice @ new rate)

Payment – Payments may be entered in either Domestic Amount or Customer’s amount based upon the currency code of the Bank Code you select for the payment. When the payment is posted, domestic amounts get posted to the journal, and customer amounts are put on the Posted Transaction record. At payment time, we perform a mini-gain/loss for the invoice and any payments, debits or credits to that invoice. All of the Posted transactions tied to the invoice will be “upgraded: to the new exchange rate.

Account Number Posted (AR Dist):

  • Debit – Cash (Payment Amt @ new rate)
  • Credit _ Accounts Receivable ( Invoice Amt @ old rate)

Difference to currency Loss (Debit) or Gain Account (Credit)

Gain/Loss Utility

At various times, users may wish to recognize any outstanding Gains or Losses. They may run this utility and specify either AR,AP or both.

AR – We process all Posted A/R Transactions and upgrade them to the current exchange rate. For each invoice that has a gain or loss, we post the amount to Accounts Receivable and the Gain or Loss Account.
AP- We process all outstanding PO Receipts (received but not yet vouchered) and upgrade them to the current exchange rate. For each record that contains a gain or loss. We post the amount to Vouchers payable and the Gain or Loss Account.

We process all unposted vouchers and upgrade them to the current exchange rate. For each voucher that has a gain or loss, we post the amount to Vouchers Payable and the Gain or Loss Account.

Gain/Loss Accounts:

  • Users establish account records for Gains and Losses.
  • The Gain Account is always used to record gains due to exchange rate changes.
  • The Loss Account is always used to record losses due to exchange rate changes.

Currency Master:
SyteLine contains a currency master file where all currencies are maintained. Users may enter an unlimited number of date & time stamped currency exchange rates. They may also back-date these rates by entering a past date. There are two exchange rates entered. The Buying rate is used exclusively in PO and AP. The selling rate is used exclusively in CO, Estimating, and AR.

Financial Statements:

Users are able to print Financial Statements in different currencies. Prior to SYMIX 4.0, they could only accomplish this when they were consolidating multiple divisions. The “final” Financial statement would be printed in the currency of the division running the report. The exchange rates used to convert the data were the ones stored in the division running the report. Now in V 4.0, users can choose which currency they wish to print their financial statements in. The exchange rates used to print the report are the rates stored in the database that contains the ledger records being processed. The translations are for display purposed only. No posting of any kind takes place & no gain or loss is calculated.
Translations are defined for each line of the financial statement. Users choose to use the Buying or Selling Exchange rate. They choose a translation method: None ( no translation), Spot ( historic rate for each transaction), Current ( current exchange rate), Average Period ( weighted average exchange rate in effect for the accounting period for each transaction), End of Period ( exchange rate in effect at the end of the accounting period for each transaction)

How to Handle Deposits or Pre-Payments to Vendor in Syteline

January 16th, 2011 No comments

Basically, this is handled through a 3-Step Process. Cut the check to the vendor, designating it as an Open payment. Receive and voucher the purchase order. Reapply the open payment against the voucher generated. Below are the steps for handling this process.

The process for handling Deposits or Pre-Payments to Vendors is as follows:

1. In the A/P Payment form, add a new record for the vendor
On the Payment Distribution form, select type “Open”
If Purchase Order Number is known, you can link the PO to this Open Payment. When check is printed, it will update the Prepaid Amount field on the Purchase Order Header.
Note: The account that defaults for the Open Payment comes from the default “Deposit Acct” from the Accounts Payable Parameter. This account change be overridden if needed.
Print and Post the check as normal.

2. When purchase order is received, generate voucher as normal from the Generate A/P Transactions form
Perform Voucher Posting to post the voucher to vendors A/P Posted Transaction Details

3. Reapply the Open Payment to voucher generated from Purchasing.
Determine the original check number of the deposit or pre-payment. (This can be found on the A/P Posted Transaction Detail form).
Open A/P Payment form
Enter a new record for the vendor, flag the record as “Reapplication”
Enter the original check number in the check number field
System will automatically recognize this as a “Reapplication”. The original amount should default in the payment amount. Save.
Either through Quick or Distribution, select the voucher/vouchers where the deposit or pre-payment needs applied against. Save.
Go to the A/P Check Printing/Posting form and perform Final Register and Post
Journal entries will be created reversing the amount from the “Deposit” account and applying it against “Accounts Payable” account

NOTE: Open Payments should NEVER be applied to vouchers via the A/P Posted Transaction Details form. Journal entries are not created from this form.

Steps to process a vendor refund

January 16th, 2011 No comments

A refund check has been received from a vendor and you need to enter it into SyteLine, the following are the steps that you should take to complete this process:

1) Go to Customer Maintenance and add a new customer record with the Vendor’s information.
2) In AP, you currently have a voucher and a payment on this vendor record. At this point, you need to decide whether or not you want this refund reflected in AP Posted Trans. If you’ll never repay this and don’t want the vendor’s balance due to increase, then you won’t enter any transactions on the AP side.
On the other hand, if you will eventually pay them back this amount, then you’ll want to adjust that payment amount, so that this refund is reflected on the voucher. In order to do that, you want to go to Vouchers and Adjustments and create an adjustment voucher against the voucher number, for the amount of the refund (should be a positive amount).
3) If you created an adjustment voucher in step (2), then you’ll need to process Voucher Posting to post that adjustment. If you didn’t, proceed to step (4).
4) In AR, create an invoice for the amount of the refund, using the new customer number that you created.
5) Perform Invoice Posting.
6) In Customer Payments, enter a payment for the new customer number, using the check # and the amount on the refund check.
7) Use Check Posting to post the payment.
Now AR has a zero balance.

Categories: Application Tags: , , ,

How to Set Up and Process Recurring A/P Vouchers

January 16th, 2011 No comments

Recurring Vouchers are designed to handle repetitive vouchers each month, where basically, only the Invoice Date, Distribution Date and Due Date change each month. The steps to set up a Recurring Voucher are as follows:

  1. Open Recurring Vouchers form (in SL4, SL5 and SL6 go to Vendor – Recurring Vouchers) New (or add)
    Enter the Vendor Number
    Voucher (allow system to assign the next voucher number)
    Distribution Date (defaults to current date. This date will be designated at time of Recurring Voucher Generation for new vouchers)
    Invoice Date (this is the date of the month that will be used for subsequent vouchers generated)
    Due Date (automatically calculates based on terms of vendor and invoice date)
    Purchase Amount (the amount of the voucher that will be generated each month)
    NOTE: This amount may be updated after the recurring voucher has been generated if needed. If amount is updated, the distribution amount will also need to be updated
  2. Voucher Distribution
    Add the necessary distributions to fully distribute the Purchase Amount of this voucher

With the steps above, you have created your template voucher. You can now generate this voucher for a new month as needed. The steps to generate the Recurring Voucher are as follows:

  • Open A/P Recurring Voucher Generation (in SL4, SL5 and SL6 go under Vendor – A/P Activities – Recurring Voucher Generation)
  • Select the range of vendors who have recurring vouchers created, or leave blank to generate for all vendors
  • Enter new month of voucher (example, you created the recurring voucher in February, and want to create a voucher for March. The new month would be 03)
  • Enter new voucher year (this will only occur when generating vouchers for January)
  • Enter Distribution Date (this will be date the voucher will be posted in the GL)
    Process

NOTE: You can review and update these vouchers in A/P Vouchers and Adjustments prior to posting.

Categories: Application Tags: ,

How to handle purchases paid by credit card

January 16th, 2011 No comments

In Syteline, when you pay for a purchase from a vendor with a credit card, you want to be able to show the purchase under the Purchase Vendor, but the payment will need to be remitted to the Credit Card Vendor.  How to handle this in Syteline?

A possible solution is to create a Bank Code for Credit Card. The cash account should be some type of clearing account. You will need to add a bank rec for type “Check” to set the starting check number for this new bank code. Receive and voucher the purchase order as normal. Post the voucher. Go into A/P Payments and add a payment record for the vendor using the Credit Card Bank Code. Either go to Quick and select the voucher that was paid by credit card, or go to Distributions and add the voucher there. Process A/P Check Printing and Posting. Add a manual voucher for the Credit Card vendor for the total amount. Use the same clearing account for the distribution on this manual voucher.

This way, the vendors purchases YTD remain in tact, and the payment is actually remitted to the Credit Card vendor.

Google Insights for Search – Web Search Interest: syteline – Worldwide, 2004 – present

March 3rd, 2010 No comments

image 

Google Insights for Search – Web Search Interest: syteline – Worldwide, 2004 – present

Looks like Syteline is fading slowly in the past 5 years.  The pick up in early this year may be related to the ad campaign Infor recently run.  Hope they really do something, no just sit there simply claim themselves as third biggest ERP software firm. 

Categories: Application Tags: , ,

DO and Consolidate Invoice

March 24th, 2009 No comments

Syteline Delivery Orders are always handled by Consolidate Invoice.

1) Shipment can be tied to a DO during the shipping process. 
2) Shipment can also be put into a DO after the shipping process.  Just open that DO and add the shipment record to that DO.
3) DO invoicing will be always under the consolidate invoice.
4) After the invoice being printed, before the invoice post, if need to change the invoice date, change inv-hdr.inv-date, inv-hdr.ship-date; and change the arinv.inv-date and arinv.due-date.

How to use the Query Form

September 23rd, 2008 No comments

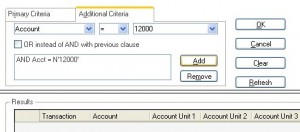
The “Query” function in Syteline allows you to use multiple selection criteria to query transaction.  The example below show you how to query manual transactions for inventory account in a given date range.

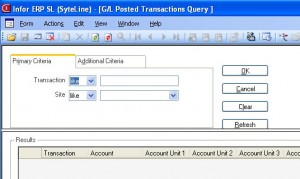
Open the “GL posted transaction query” form.ScreenShot001

Click “Additional Criteria” tab.
ScreenShot002
In the first pull down list, select “Account”.  In second pull down list, select “=”.  Put in an account#, or select from pull down list in the last field, then click the “Add” button.

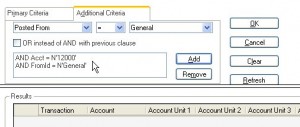
ScreenShot003Select “Posted from”, let it “=” to General.  That means we will only select transactions that is posted from “General Journal”, instead of normal inventory transactions that are posted from “IC Journal”.  Then click the “Add” button.
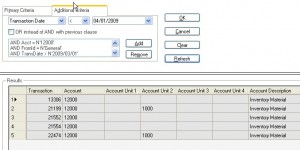
Repeat the similar process for “Transaction date”, to give a date range.  Once finished entering all the criteria, click the “Refesh” button.  Transaction data should shows up.

ScreenShot004Right click on left-upper corner of the grid, from the menu, select “To Excel”, you will then be able to export the data to Excel.

The similar query process will work on all the “Query” form.

Categories: Application Tags: , , , , ,

Syteline Payroll Generation Logic.

June 19th, 2008 No comments

Payroll Generation: pr/pr-trxg.p, main logic in pr/pr-trxg1.p

Payroll record prlog can be generated from 4 differ sources:

  1. Manufacturing transaction jobtran.  The Generate Payroll From field on the Employee Master must also be set to M. The summarized transactions include: WC Labor, WC Machine Time and Job Labor.  prlog.posted-from = “M”.
  2. Manufacturing Project transaction projtran.  The Generate Payroll From field on the Employee Master must also be set to M.  prlog.posted-from = “M”.
  3. Time and Attendance record timeatt.  The PR From field must also be set to T. Total Hours are calculated on the time between clock-in and clock-out with all break times subtracted out. After each time & attendance transaction is summed to the Payroll Transaction record, the time & attendance transaction status is changed from Unposted to Posted.  prlog.posted-from = “T”.
  4. Attendance transaction prhrs.  When the reason code is set to Vacation, Holiday, or Sick, the record is treated as if it were the Vacation, Holiday, or Sick record entered into the Payroll Hours file.  prlog.posted-from = “P”.  Noted that prhrs record got deleted after the process (prlog created.)
  5. empabsence.  prlog.posted-from = “X”. 

Pay Rate calculation.   pr/calcrate.p

Example:        run pr/calcrate.p (recid(employee), prlog.hr-type, true,
prlog.shift, prlog.work-date, FALSE, OUTPUT prlog.pay-rate).

Where is the MPS data stored

May 16th, 2008 No comments

The table contains MPS is rcpts with the ref-type = “M”.  rcpts also contain other records that generated by MRP.  To remove any MPS demand, remove rcpts records with ref-type = “M”.