Archive

Archive for the ‘Implementation’ Category

Problem caused by changing slservice password

November 22nd, 2011 No comments


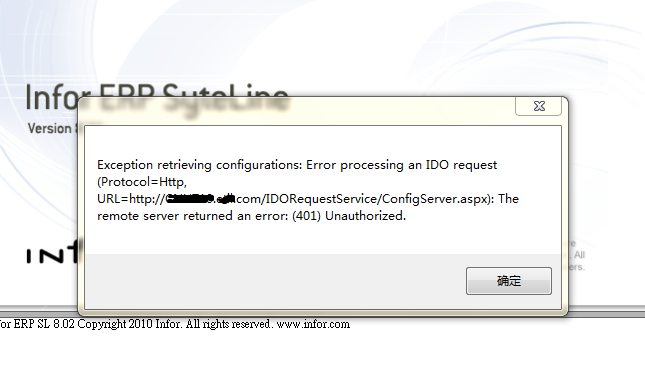
During Syteline installation, you provided a domain account (normally it would call something like SLService, and belongs to domain admin group), to install all the Syteline service.  If later on, you somehow change the password for this account, you would have problem access to Syteline.  Error message likes below would popup. 

It may also happens when user preview a report, below “access denied” message show up

Here are the steps for fixing this,

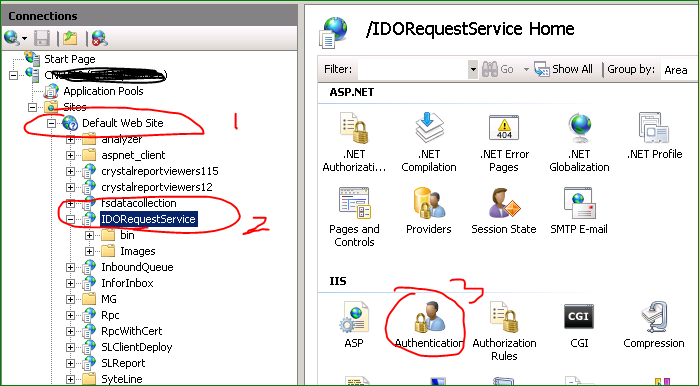
First, in Utility server, go into IIS, check into IDORequestService

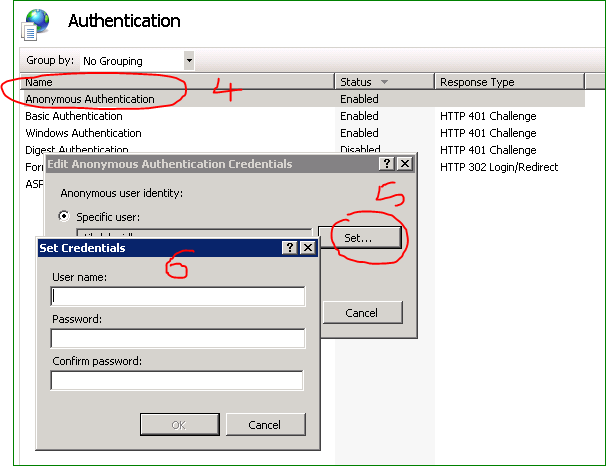
Open the Authentication windows, right click on Anonymous Authentication and select “Edit”.  In “Edit Anonymous Authentication Credentials” window, click the “Set” button, then provide userid/password there.

Repeat the steps for SLClientDeploy, InforInbox, InboundQueue, fsdatacollection。

Now, you are ready to test it out from client side.

How to back out an AR payment applied incorrectly

October 24th, 2011 No comments

Let say you have an AR payment applied to an incorrect invoice. And you need to remove the payment from incorrect invoice and apply it to a different invoice.

If you do not need to change the check number, then you can update the applied to invoice number in the AR Posted transaction Detail form. Pull up the record for the payment and change the apply to invoice number from the incorrect invoice number to the correct invoice number. 

If your check numbers are tied to the invoice numbers and you need to create a new payment to apply to the correct invoice, you will need to adjust the AR payment.
1) Open the AR payment form and add a new record for your customer.
2) Type will be adjustment and you will  need to enter your original check number in the number field. Save.
3) Enter the amount as a negative number and save
4) Click on the distributions and type in the invoice number that the payment was originally applied to.  Enter the amount as a negative amount. Verify that the amount remaining is 0
5) In the AR Adjustment Posting, post the payment adjustment.
6) In AR payments, create the new check and apply to the appropriate invoice

Void an AP Posted Payment

October 16th, 2011 1 comment

In Syteline 8, there is an utility program called Void AP Posted Payments Utility, which you can use to void an AP posted payment.  But if any of the following conditions exist, you can’t use this utility. 

1) Multi-site environment

2) You compress Journal transactions

3) You are trying to void a manual type check

4) The same check number has been used in multiple bank codes

You will need to void using a manual negative check when any of these conditions exist.

The steps to enter a negative manual check in SL7 and SL8 are as follows:

1. Open Bank Reconciliations Form
Filter for Bank Code
In lower grid, filter for type Manual
Identify a manual check number that has NOT been used

Note:  If  you are trying to void a standard check, you can use the check number on the standard check

2. Open A/P Payments Form
New
Enter Vendor Number
Payment Type = Manual
Check Number = Available Manual Check Number
Bank Code = Bank Code on original check
Payment = Enter negative check amount
Save

3. Distributions
Type = Voucher
Vch/Seq = Voucher Number that was paid on original check
Accounts Tab:
Amount Paid = Enter negative payment amount
Disc Taken = Enter negative amount if discount was taken on the original check
Save

NOTE: If more than one voucher was paid on the original check, follow step 3 for each voucher paid

4. Activities – A/P Check Printing/Posting
Verify Bank Code is correct
Click Final Register And Post
Process

How to setup an Area Based Tax System

October 15th, 2011 No comments

For Businesses operating in Canada:

The Syteline system presumes that the main tax system (GST) will be setup as Tax System 1 with a Tax Mode of either Item or Area depending on the requirement of the province. The Syteline system also presumes that PST and HST will be setup as Tax System 2 with a Tax Mode of Area.

For any European Economic Countries and Australia:

The Syteline system presumes that the main tax system (Sales Tax or VAT Tax) will be setup as Tax System 1 with a Tax Mode of Item.

For the United States:

The Syteline System presumes that the main tax system (Sales Tax) will be setup as Tax System 1 with a Tax mode of Area.

The Parametric Sales Tax System allows the User to set up Tax Systems to change sales tax at the "Item" level or an "Area" level.
The Area Based Tax System, which applies to U.S. Companies, allow taxes to be charged at the header level, Setting up the Tax Codes entrails assigning tax rates to a State Tax Code. The flags "Include Price" and " Include Misc." Should be set to YES and the A/R tax account number needs to be defined.
Under the Area Tax System, if an item is tax exempt (as specified in the item master), the system will ignore the tax code at the header level and not charge sales tax. If the item is taxable, the system will charge tax based on the "ship to" customer’s tax code ( or the "bill to" if it is the same as the "ship to" customer). If a line item is "dropped shipped", tax will be charged based on the tax code of the "drop ship" customer. This will override the tax status of the line item and the header tax code. If the user wished a message to appear, asking if sales tax should or should not be charged based on the tax code of the drop ship customer, then the following two flags must be set to YES:
"Prompt on Line Item" flag on the Tax System screen. This flag will prompt that the item is taxable or non taxable at the item level of an order.
"Prompt for State Tax" flag on the Tax parameters screen. This flag will prompt that the item is taxable or non taxable in the item master sales screen and page two of the Customer Order Header.
The Item Based Tax System will mainly apply to Canada, UK and European countries. It allows sales tax to be charged at the item level and tax codes to be specified in the item master. (For example, the GST in Canada.) The system will look at the tax rate of the item and override the tax code on the header.
The Parametric Sales Tax System was designed to allow flexibility mainly for the European Community. Many of the fields and flags should be ignored ( or set to "NO") for U.S. Countries.
The following fields give a brief description of what all is involved with the tax structure. The fields with a * indicate they are relevant for the AREA based tax system ( U.S. Countries.)

I. GENERAL PARAMETERS:

  • EC Reporting: "Y" Activates EC VAT information.

  • ED Weight Conversion Factor: Converts Weight field in item file to kilograms ( unit weight on EC SSD.)

  • Capitalize State: "Y" – Upper Case

II. TAX SYSTEMS: (File, System, TS) – Can have both tax systems working simultaneously.

  • AREA (US Business) – allows tax rates to be entered at the header level.

  • ITEM (European/ UK) – only allows tax rates to be entered at the item level. (Taxes based on each item of the sale -VAT.)

  • PROMPT ON LINE ITEM- Will show the item is taxable or not at the item level of an order. Will also give y/n message to change "drop ship" tax codes per line item.

  • PROMPT TAX CODE LABEL- Allows use of set up labels ( header).

  • PROMPT TAX CODE ITEM LABEL- Allows use of set up labels (item).

  • PROMPT AMOUNT LABEL- Allows use of set up labels (amount).

  • TAX ID LABEL- (ex: Federal ID# on Vendor Screen)

  • ACTIVE FOR PURCHASING- Can turn off Purchasing Side (normally "No"). Can be edited at the distribution level. (Primarily used for EC).

  • USE WHOLESALE PRICE- Will cause a secondary Unit Price Field to be displayed/updated on the Item Master screen. (Calculates taxes in place of the "real" item master unit price.) Wholesale price used first.

  • APPLY TO PROGRESSIVE BILLING- Indicates if taxes should be billed during Progressive Billing.

  • RECORD ZERO RATED- "Y" if it is necessary to record/report transactions which have a tax amount of zero. (May be used for later reporting.) Ex: Selling children’s clothing (textile industry.)

  • TAX ID PROMPT LOCATION- Enables/Disables prompting for the Tax ID on Customer/Vendor screens. (C,V,B)

  • DEFAULT ITEM TAX CODE- Used for new items entered into the Item Master.

  • AR/AP TAX CODE: Tax Code = That of the Customer Vendor.

  • FREIGHT/MISC. TAX = AR/AP Tax Code default.

  • DEFAULT CUST/VEND TAX CODE – Default for Customer/Vendor Screen.

  • COMMISSION TAX CODE – That default rate will calculate tax on commissions.

  • NON A/P TAX CODE – Will default to what is filled in for Non-A/P Payments.

III. TAX PARAMETERS

  • Set to company’s specific reporting and functionality requirements.
  • STARTING TAX PERIOD DATE – Stores the dates following the last submission of the VAT return and SSD report.

Usual Field Values For US:

  • CASH ROUNDING FACTOR = 0 (If >0, "Cash Only Flag" is prompted on Billing Terms screen. "Y" will round final invoice to the nearest cash rounding factor.)
  • PROMPT FOR TAX DISC. = NO; if yes, will prompt to only pay taxes on the final amount they are paying (after discount). Must apply to the Taxing Authority to qualify.
  • PROMPT FOR PRICE INCL. TAX = If YES, tax is fixed in price when invoice is posted.
  • PRINT TAX CODES ON INVOICE = "Y" prints tax codes on invoices.
  • PRINT TAX FOOTER ON INVOICE = "Y" prints a Tax summary on invoices.
  • *PROMPT FOR STATE TAX: YES – Will prompt for if an item is taxable/non-taxable in the item master. Will also give Y/N message to change "drop ship" tax codes per line item.
  • TWO EXCHANGE RATES -Used for Multi-Currency.

IV. TAX JURISDICTIONS

Used to record where taxes are located. Allows the user to group the tax codes into Jurisdictions. Each tax code can be assigned a Jurisdiction. Ex: EC = FR (France UK) Tax ID in France. (Not applicable in US.)

V. TAX CODES

1 Set of Tax Codes per Tax System. * Choose between E (Exemption) or R (Rate).

  • TAX AT ITEM LEVEL: (Item Master, Sales)
  • TAXABLE BLANK: Taxed at Rate that is on the header (Tax Code Type = E (Exemption) or N – Not Taxable – That line item will not be taxed.)
  • HEADER BLANK- Individual items get taxed at the rate set by the Tax Codes at the item level.
  • HEADER-ZERO – Entire order is presumed tax exempt.
  • ASSESS ON RETURN – Active for Vouchers. Indicates tax was never paid on the item and must be assessed at the time of return.
  • DEDUCTIBLE – Active for Vouchers. Indicates that the item purchased is deductible from taxes. (i.e. Syteline user is not the end user of the item.)
  • INCLUDE PRICE, DISC., FRT., MISC. – Y/N – What amount should be taxes?
  • INCLUDE PRICE ON PREV. SYSTEM – Causes the tax amount calculated on Tax System 1 to be added to Tax System 2.
    * Tax Account # must be entered.

Configuring Click-Once clients to access SyteLine 8 remotely

October 15th, 2011 No comments

For Report Previews to work, the SL 8 Click Once Client needs to authenticate to the Utility Server Syteline directory where the reports are actually generated.

Click Once Client users only require internet access to the Website to download the Click Once Client. They do not need network permissions to access the directory on the Utility Server where the Previews are generated to.

For Click Once Client users on the domain, you can adjust the security on the utility server directory to give the user’s access to the SyteLine report output directory:
C:\Program Files\Infor\SyteLine\Report\OutputFiles  

For Click Once Client users outside the domain and/or firewall, clients may not be able to download and the run the Click Once client unless changes are made to the client’s HOSTS file.  You may receive an error similar to the following when accessing the click-once URL: 

* [11/29/2007 1:24:54 PM] : Activation of http://10.21.1.46/SLClientDeploy/SyteLine.application has started.  ERROR DETAILS
   Following errors were detected during this operation.
* [11/29/2007 1:25:16 PM] System.Deployment.Application.DeploymentDownloadException (Unknown subtype)
– Downloading http://sline_utl1/SLClientDeploy/SyteLine.application did not succeed.

Resolution

One way to resolve this is:  On the user’s computer running the Click Once client from outside of the domain, you will need to edit the file C:\WINDOWS\system32\drivers\etc\hosts. 
For example:

After the line:
127.0.0.1 localhost
Add the line:
10.21.1.46 SyteLine_UTIL1

Another way to resolve this is: Create an IIS Virtual Directory, is to create a virtual IIS directory on the Utility Server. Windows 2003 as follows:

On the SyteLine utility server, open IIS Manager
Right click Default Web Site
Select New>Virtual Directory
Name the folder ‘SLReports’ and designate the directory path C:\Program Files\Infor\SyteLine
Virtual Directory Access Permissions were set to READ, WRITE, and BROWSE.
Open Intranets form and go to the Reports/Taskman tab
Enter http://<servername>/SLReports in the Report URL field
or use http://ipaddressofserver/SLReports
On Windows 2008:

Right click Default Web Site
Select Add Virtual Directory
Set Alias as SLReports
Set Physical Path to the installation directory, usually: C:\Program Files\Infor\SyteLine
This should create the Virtual Dirctory for you. Click on it. In the middle pane there should be a Directory Browsing icon, double click that
In the right hand pane here, click Enable.
In SyteLIne, open Intranets form and go to the Reports/Taskman tab
Enter http://<servername>/SLReports in the Report URL field
or use http://ipaddressofserver/SLReports
Replace Report Logo

October 15th, 2011 No comments

Changing the Report Logo for Syteline is fairly easy.  Just place a new SLHeaderLogo.bmp (your company logo) in the C:\Program Files\Infor\SyteLine\Report\Reports folder in the utility server.

If you have multiple Syteline configurations for differ branch companies, and want to use differ logos, you can create folder under the above Reports directory.  Make the folder name matches exactly the configuration name, and put the logo inside the folder.  Syteline is smart enough to pick them for each configuration.  The same thing applies to report customization too.

China VAT Tax setup in Syteline

October 15th, 2011 No comments

Tax system 1, set to be area tax

image

image

Tax code

17% VAT tax for normal product and goods.

3% VAT tax for small enterprise.

There may be 5% normal business tax (not VAT, not deductible)

image

Vendor

image

Customer

image

Customer Order Header

image

image

Purchase Order Header

image

image

Amount tab, cost amount has excluded tax.

image

Database table fields in Syteline Item Cost Form

October 15th, 2011 No comments

There are just so many cost related fields in item table.  I here try to map them out one by one with fields in Item Cost Form

image

Purchased Current Unit Cost:

cur_mat_cost

cur_duty_cost

cur_freight_cost

cur_brokerage

cur_insurance_cost

cur_loc_frt_cost

Manufacturing Current Unit Cost:

cur_matl_cost

cur_lbr_cost

cur_fovhd_cost

cur_vovhd_cost

cur_out_cost

Unit Cost

matl_cost

unit_mat_cost

unit_duty_cost

unit_freight_cost

unit_brokerage_cost

lbr_cost

fovhd_cost

vovhd_cost

out_cost

Unit_Cost

image

Unit Cost

Current Unit Cost:  cur_u_cost

Unit Cost: unit_cost

Assembly

asm_setup

asm_run

asm_matl

asm_tool

asm_fixture

asm_other

asm_fixed

asm_var

asm_outside

Accumulated

comp_setup

comp_run

comp_matl

comp_tool

comp_fixture

comp_other

comp_fixed

comp_var

comp_outside

image

Standard is from frzcost table.

Setup Chinese Font for Syteline Report Output in Chinese.

October 15th, 2011 No comments

In order for output print out in Chinese correctly, you will need to set up the font in Language ID form for zh-CN

image

Copying Syteline Financial Statement

October 15th, 2011 No comments

When creating a new Syteline financial Statement, it is much easier to work on a copy of existing statement report, instead of starting from scratchy.  You can certainly use the Excel export/import to do the copying, but one part of the financial statement line, the total tab, would not get copied over that way. 

image

Syteline Financial Statements are stored in the following tables.

1) glrpth   statement definition

2) glrpthc   statement columns definition

3) glrptl      statement lines definition

4) glrptls    statement lines definition, total tab, line add up

5) glrptlc    statement lines definition, total tab, column defined.

By using Excel import, only the above 4) would not get copied over correctly.  You may use the following script to get the copy completed.

insert into glrptls
(rpt_id, seq, from_seq, to_seq, total_add)
select
‘New_Report_ID’, seq, from_seq, to_seq, total_add
from glrptls  tt1 where tt1.rpt_id = ‘Old_Report_ID’

One thing to remember, before running the above script, re-set sequence for both new and old report, make them both start from 10 and increment by 10.  This is to ensure both have the identical sequence.  Or, better yet, before you do the Excel import/export, re-set the sequence in old report.