The out of box Syteline missed some of the detail carelessly. For example, the Grid view for RMA is sorted by RMA date ascending. So it shows the oldest RMA up front and you are seeing those years old closed RMAs.
Syteline Application Case
Change the sorting of Grid view in RMA form, to show the latest RMA up front.
Syteline Technical Component
Form, Primary Collection, Collection Property
Customization Solution
This is pretty easy to change. Go to Edit mod, in the form collection property, change the Order by to “RmaNum Desc”. Done.

Sometime, while you are making modification on a Syteline form in design mode, system would crush on you. Even after you log out and log back in, and try get into the design mode again, the error message would keep coming up, preventing you using any function in design mode.
This usually only happen to your PC. To fix it, do the following:
1) log off Syteline.
2) Go to C:\Documents and Settings\YOUR WINDOW USER NAME\Local Settings\Application Data\Infor\WinStudio. You should see two xml files there. Delete them.
3) Log back in Syteline, go to design mode. You should now see anything working OK again.
In Syteline 8, some time in some forms, the horizontal scrollbar in Grid mod would some how missing. User can not see all records in the data set.
This often due to that when developer making modification to the form, some how make the height of Grid mod screen disagree with the height of the main screen. To correct that, enter into design mod, in the form property, copy down whatever value in the Height property. Then click on the grid to go to FormCollectionGrid, locate the height property, paste the value in. This way, you make sure the height for both Grid and main screen are the same. This should fix the problem
This is considered by some people as Holy Grail of Syteline Form Personalization.
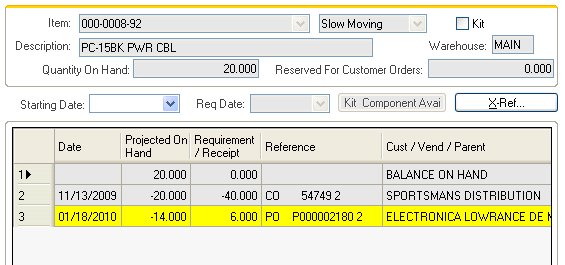
Here is what we want to do. In “Time Phased Inventory” form, we want to change the color to yellow for those rows that is PO.
First, we need to create a new form script method, called SetPOColor()
Sub SetPOColor()
Dim i as Integer
Dim j as Integer
Dim sReference As String
Dim sRef3 As String
Dim sRef4 As String
Dim oSupDem As IWSIDOCollection
oSupDem = ThisForm.PrimaryIDOCollection.GetSubCollection(“SLSupDems”, -1)
j = oSupDem.GetNumEntries
‘ MsgBox(“j = ” + CStr(j))
For i = 1 To j
sReference = ThisForm.Components(“SLSupDemsGrid”).GetGridValueByColumnName(i, “SLSupDemsReferenceSubGridCol”)
sRef3 = Mid(sReference, 1, 3)
sRef4 = Mid(sReference, 1, 4)
If sRef3 = “PO ” Or sRef4 = “XPO ” Then
ThisForm.Components(“SLSupDemsGrid”).SetGridRowColColor(i, 0, “255,255,0”, “”)
End If
Next i
ThisForm.Components(“SLSupDemsGrid”).ForceRepaint
End Sub
Secondly, we create a new event handler for event “StdObjectSelectCurrentCompleted”, to call the above form script method SetPOColor().
Done. Now here we are:

Each component in Syteline form can have its own right click menu, and this right

click menu is customizable.
See the sample, the “Ship To” field has a standard right click menu, with “Add”, “Detail”, “Find” and “Help” menu items.
If you look into the component property of “Ship To” field, you can see the “Right Click Menu” property is blank. But this property is inheriting from the component class: CustSeq. In there, the right click menu defined to be StdDetailsAddFind.
There are list of the pre-exist right click menu you can use, such as “StdAddFind”, “StdHelp” and such.
You can also modify or create a new right click menu by go into the “Shortcut Menu Properties” dialog box.

Over there, you just need to define the “Menu Item/Caption” and the “Event to Generate” for each of this menu item.


Recent Comments