Archive

Posts Tagged ‘programmer’

Events For Non-Query Forms

January 3rd, 2010 2 comments

For Syteline programmer, when doing the form personalization, it is important to understand the various event sequence for Syteline Forms, so you can know where to put your customized logic in. The following list outlines the sequences of events during form execution for non-query forms.

1. Form initialization

StdFormPredisplay is always the first event to fire. At this point, the components are all created, and the caches, if any, exist and are initialized, but have not yet been loaded with data.

Depending on the initial command, the events generated vary:

Refresh (after the refresh is performed):

StdFormLoadBoundValues

StdFormLoadDerivedValues

StdObjectRefreshCompleted

New (after the new is performed)

StdFormLoadBoundValues

StdFormLoadDerivedValues

StdObjectNewCompleted

Filter (by query):

StdFormLoadBoundValues

StdFormLoadDerivedValues

Meanwhile, the filter form is launched; nothing further occurs until the user finishes with the filter form.

FilterInPlace

The form enter filter-in-place mode; the normal events are generated once the user cancels or executes the filter-in-place.

Default (initialize with auto-insert new if new is enabled)

StdFormLoadBoundValues

StdFormLoadDerivedValues

StdObjectNewCompleted (only if new is enabled and the auto-insert new took place)

Event custom (as defined by the developer)

2. New, including auto-insert new

StdObjectNew

StdFormGetBoundValues

StdFormPerformValidations

StdFormValidationsCompleted

(at this point, the new object is actually inserted into the cache, and becomes the current object)

StdFormLoadBoundValues

StdFormLoadDerivedValues

StdObjectNewCompleted

3. Delete

Due to navigating away from unmodified auto-insert row

StdFormLoadBoundValues

StdFormLoadDerivedValues

StdObjectDeleteCompleted

Marking existing record deleted

StdObjectDelete

StdFormGetBoundValues

StdObjectDeleteCompleted

Deleting new record

StdObjectDelete

StdFormGetBoundValues

StdFormLoadBoundValues

StdFormLoadDerivedValues

StdObjectDeleteCompleted

4. Navigation (substitute “Previous”, “First”, or “Last” for Next for those cases):

StdObjectNext

StdFormGetBoundValues

StdFormPerformValidations

StdFormValidationsCompleted

StdFormLoadBoundValues

StdObjectNextCompleted

5. Refresh

StdObjectRefresh

StdFormGetBoundValues

StdFormLoadBoundValues

StdObjectRefreshCompleted

6. RefreshCurrent

StdObjectRefreshCurrent

StdFormGetBoundValues

StdFormLoadBoundValues

StdFormLoadDerivedValues

StdObjectRefreshCurrentCompleted

7. Filter by query

StdFormFilter

variety of events from query form

StdFormCalledFormReturned

(Query form)StdFormClose

If query form returns Ok

StdObjectRefresh

StdFormGetBoundValues

StdFormLoadBoundValues

StdFormLoadDerivedValues

StdObjectRefreshCompleted

8. Filter in place

Ending with Execute:

StdFormFilterInPlaceBegin

StdFormGetBoundValues

StdFormFilterInPlaceExecute

StdFormGetBoundValues

StdFormLoadBoundValues

StdFormLoadDerivedValues

StdObjectRefreshCompleted

Ending with Cancel:

StdFormFilterInPlaceBegin

StdFormGetBoundValues

StdFormFilterInPlaceCancel

StdFormGetBoundValues

StdFormLoadBoundValues

StdFormLoadDerivedValues

9. Form close

StdFormClose

10. Focus change from one component to another, whether by keyboard or mouse:

If there is a lose focus event specified for the component losing focus, and if the previously current component’s data is modified, then the following occurs for the previously current component:

If the component has the validate immediately attribute:

Move the value to the data source if variable- or standard-object bound, but without refreshing dependents of data source.

Run validators; if this succeeds, then the component modified flag is turned off.

Notify dependents of component to refresh themselves.

Place the value to the data source again (for variable- or standard-object-bound components), this time refreshing dependents of data source.

If there was no validation error, and data changed event specified, generate the data changed event.

If there is a gain focus event specified for the component receiving the focus, the gain focus event is generated.

11. Data modification to a component:

If the modification is “immediate” (selection from a drop-down, selection change in a list box, or clicking a check box or radio button):

Component is marked modified.

If the component is standard-object-bound, then the current object is marked modified.

If the component has the validate immediately attribute:

Move the value to the data source if variable- or standard-object-bound, but without refreshing dependents of data source.

Run validators; if this succeeds, then the component modified flag if turned off.

Notify dependents of component to refresh themselves.

Place the value to the data source again (for variable- or standard-object-bound components), this time refreshing dependents of data source.

If there was no validation error, and data changed event specified, generate the data changed event.

Otherwise: no events are generated, but the following flags are adjusted:

Component is marked modified.

If the component is standard-object-bound, then the current object is marked modified.
Categories: Development, VB .Net Tags: , ,

Convert a String to a Date / Time in VB

February 4th, 2009 No comments

Use CDate to convert a string to a date/time.

Dim d1 As Date
Dim d2 As Date
Dim d3 As Date

d1 = CDate("August 12, 2004")
d2 = CDate("2:07:30 PM")
d3 = CDate("August 12, 2004 2:07:30 PM")

Print d1  ' prints 8/12/2004
Print d2  ' prints 2:07:30 PM
Print d3  ' prints 8/12/2004 2:07:30 PM

Today’s Date

January 24th, 2009 No comments

It is very often that you need to get current date/time in your development.

T-SQL

To get today date without time as string variable use following script:

Select CONVERT( CHAR(8), GetDate(), 112)

To get datetime variable of today date without time use following script:

Select CAST( CONVERT( CHAR(8), GetDate(), 112) AS DATETIME)

VB

System.DateTime.Now.ToString(“yyyyMMddhhmmss”)

Now()

To initiate a date field as today’s date in Syteline form, need to use CURDATE().

How to block “PO Box” being entered into Customer Ship To Address

January 23rd, 2009 No comments

Problem:

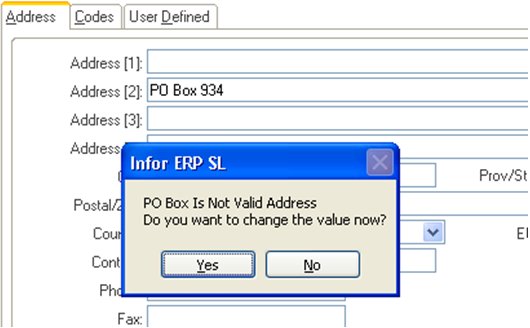
Many business would not allow product shipped to a “PO Box” address.  So would like to block any “PO Box” address being entered into any ship to address.

Solution:

1)      Enter design mode of “Customer Ship Tos” Form.

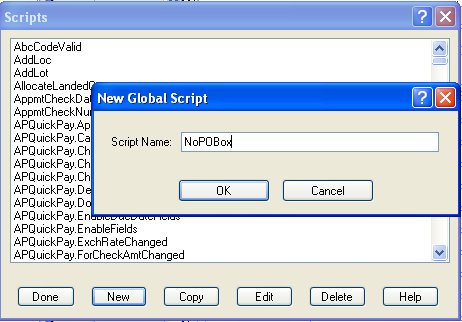
2)      We are going to first create a script.  Go to “Menu -> Edit -> Script”, a Script window should open.  Click “New”, enter Script Name called “NoPOBox”, then click OK.

NoPOBox1

Put in the following script:

Option Explicit On

Option Strict On

Imports System

Imports Microsoft.VisualBasic

Imports Mongoose.IDO.Protocol

Imports Mongoose.Scripting

Namespace SyteLine.GlobalScripts

Public class NoPOBox

Inherits GlobalScript

Sub Main()

Dim strValue As String

Dim logicYN as boolean

Dim logicYN1 as boolean

Dim logicYN2 as boolean

Dim logicYN3 as boolean

Dim logicYN4 as boolean

strValue = GetParameter(0).ToUpper()

logicYN = strValue like “*PO BOX*”

logicYN1 = strValue like “*P.O BOX*”

logicYN2 = strValue like “*P.O.BOX*”

logicYN3 = strValue like “*PO. BOX*”

logicYN4 = strValue like “*P.O. BOX*”

If logicYN or logicYN1 or logicYN2 or logicYN3 or logicYN4

ReturnValue = “1”

else

ReturnValue = “0”

end if

End Sub

End Class

End Namespace

Then “OK” to save the Script, and “Done” to close the Script window.

3)      Create a Validator.

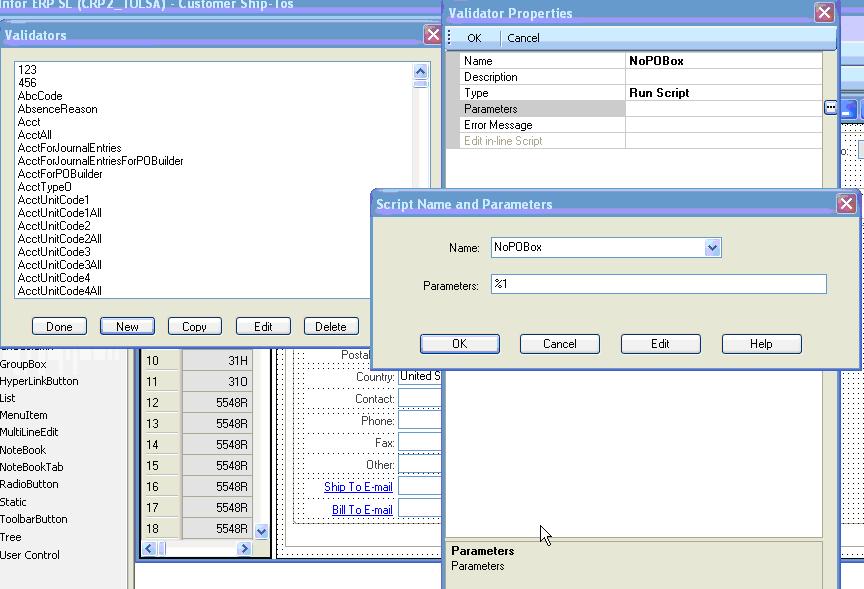
While we are still in the design mode of “Ship Tos” Form, from menu, go to “Edit -> Validator”.  A “Validator” window open, click “New”.  In the “Validator Properties” window, enter “NoPOBox” as name, “Run Script” as type.  Select “NoPOBox” as script name from the pull-down list, that is the script we just created in step 2).

NoPOBox2

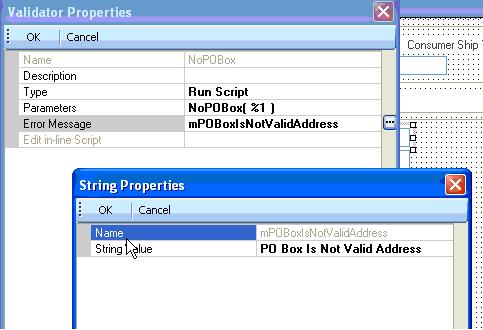
Then, create Error Message: “PO Box Is Not Valid Address”.

NoPOBox3

Click OK all the way back, we now have created a validator called “NoPOBox”, and we can apply it to the fields that we want to validate.

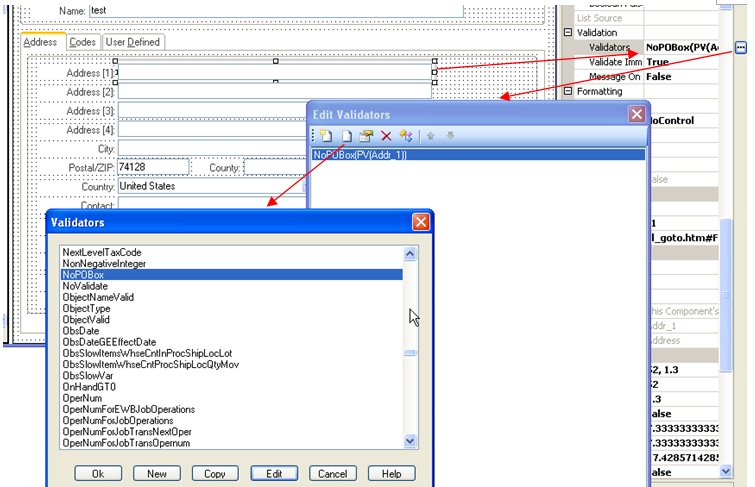
4)      Apply validator

NoPOBox4

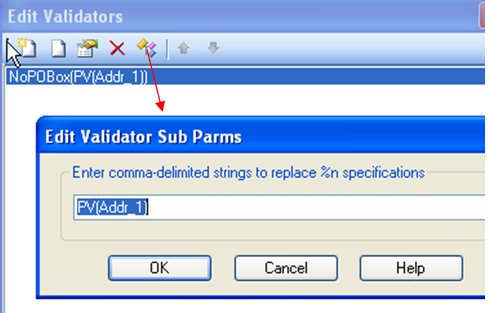
Click to enter PV(Addr_1), that means property value of Addr_1, as parameters.

NoPOBox5

5) Now save the change and exit out of design mode, we should be able to see the validation is working:

NoPOBox6

Where is the MPS data stored

May 16th, 2008 No comments

The table contains MPS is rcpts with the ref-type = “M”.  rcpts also contain other records that generated by MRP.  To remove any MPS demand, remove rcpts records with ref-type = “M”.


Landed Cost

May 4th, 2008 No comments

Landed costs may be added to purchase order lines in order to receive estimated costs for freight, duty, and brokerage into the inventory value of an item.  Each of the separate landed cost components may be paid to the purchase order vendor or to a different vendor.  Landed cost capitalization is available for both actual and standard costing.

Landed cost setup requires accrual accounts in the Purchasing Parameters file and a landed cost inventory adjustment account in the Product Code file for those inventory items for which landed cost is to be activated.

To set up Purchasing Parameters: File ->Parameters->Purchasing ->Purchasing Parameters ->Edit->Update

Enter accounts in the following fields – Freight Payable Acct, Duties Payable Acct, and Brokerage Payable Acct

To set up Product Code file account:  Modules ->Inventory ->Item Master ->View ->Files->Product Codes ->Product Code – Miscellaneous

In each product code record, enter an account in the Landed Cost Inv Adj Acct field

To use Landed Cost functionality, add Purchase Order and PO lines.  Assign estimated costs and vendors for freight, duty, and brokerage:

(From PO screen)  View -> Landed Cost ->Edit ->Update

Add a Freight Vendor and Frt Alloc Type.  Freight, duty, and brokerage may be calculated using either percentage of cost or a fixed amount.

These costs are then allocated over all lines on the PO by one of the following three methods:

  • Cost:  The total cost for the PO and the proportion of each PO line’s cost to the total cost will be determined.  The estimated landed cost amount will then be allocated across all PO lines according to the same proportion.
  • Unit:  The total number of units for the PO and the proportion of each PO line’s units to the total number of units will be determined.  The estimated landed cost amount will then be allocated across all PO lines according to the same proportion.
  • Weight:  The total weight for the PO and the proportion of each PO line’s weight to the total weight will be determined.  The estimated landed cost amount will then be allocated across all PO lines according to the same proportion (weight field stored in the Item Master General screen).  The following points are important when using weight:
    • Zero weight items will have a zero landed cost assigned
    • Weight allocations will not be allowed if all PO lines have zero weight
    • Weight units of measure will not be considered, therefore, incorrect allocations could result when weight units of measure are mixed  (ie – lb and kg)

Enter estimated freight charge if the allocation type is Amount or add a percentage if type is Percent

Repeat for duty and brokerage charges

Perform allocation by selecting Activities, Allocate Landed Cost

These amounts will then be reflected in the Unit Cost field on each PO line.  When the PO is received, these amounts will be added to the cost of the item received into inventory if an actual cost item, or be considered in a variance calculation if a standard cost item.

The calculated landed costs may be overridden by the user from the PO line by selecting “Update Costs” in the Edit-Update mode, and entering a new value in the appropriate landed cost fields.  The “Overridden” box will be marked.  Any lines marked as overridden will be ignored on subsequent allocations and the costs for the overridden lines will be subtracted from the landed cost estimate for the PO.

Vouchering Landed Costs

At the time of purchase order receiving, two purchase order receipt records will be created, one for material costs and one for landed costs.  Once an invoice has been received from a vendor, generating vouchers for the landed cost receipts is done in the AP module.

Modules ->Vendor ->Vouchers and Adjustments ->Activities ->Generate Landed Cost Vouchers->Edit ->Update ->Header

Enter the vendor from which the invoice is received.  Enter the invoice number and actual amounts for duty, freight, and/or brokerage charges.

Receipts to be paid by this invoice may be selected by a combination of sorting criteria, including the Selection Method, Landed Cost Type, and Receipt dates

Choose a Selection Method as follows:

  • S  to display landed cost receipts for only this vendor
  • O  to display landed cost receipts that do not have a vendor assigned
  • SO  to display both

Blank to display landed cost receipts for all vendors within the date range

Choose the Landed Cost Type as any combination of (D)uty, (F)reight, and/or (B)rokerage

Enter beginning and ending receipt dates to narrow down the selection

All landed cost receipts that match the selection criteria will be displayed.  Select the lines to be included in this voucher by utilizing the selection options under the edit menu.  Highlight each line to be chosen, and then Edit-Select/Select All/Deselect

Highlighted lines may be updated to indicate the actual amount to be paid to the vendor (Frn Trans Amt) and whether or not variances should be recognized at this time for the receipt (Final = Yes).  A landed cost variance is calculated when the estimated landed cost is different from the vouchered landed cost.  “No” should be selected in the “Final” field when less than the entire quantity is vouchered.  When the balance is vouchered on a later invoice, “Yes” should be selected in order to recognize the variances.  If the entire PO line has not been received and “Final = Yes” is indicated in this screen, an error message will prevent the user from posting this line as final.

After the selection process is complete, select Activity –  Generate Voucher.  Vouchers are posted to the Vouchers and Adjustments file.

In the Purchasing module, the Landed Cost Variance Report is available to assist in analyzing variances.

Modules ->Vendor ->PO Reports ->Landed Cost Variance

Why MRP Failed with Low Level error?

January 15th, 2008 No comments

Why MRP Failed with Low Level error?

At the end of the MRP Generation, you receive the following error:

[WARNING – Low level codes are improperly set. MRP Generation is not complete – re-run Net Change. MRP PROCESSOR] was not successful.

If you receive this error at the end of running the MRP Generation, it may or may not mean that the low level codes in the item master are improperly set. When the MRP Generation completes, it scans the item master file for any item where the “Net Change” flag is yes. All flags should be no if MRP runs successfully.

If any items are found with the net change flag set to yes, MRP displays the above error. Although it is not always the case, MRP is making the assumption that items found were not processed due to a low level code problem. The following are all of the known reasons for why this error may occur:

1) Low Level Codes are incorrect.

This is the most common reason for this message. To ensure that low level codes are accurate you should first run the “Current BOM Processor” and then the “Job BOM Processor” before running the MRP Generation. If your low level codes are not correct, your MRP data will not be accurate for the problem items and all items below them in your BOM structure.

Because of the nature of these algorithms, running them both and doing so in the proper sequence is crucial. Not running the job processor or running it before the current BOM processor may result in incorrect codes. There is a utility attached to this entry that can be used to display any items that have an incorrect low level code after the two processors have been run.

An alternative to running both processors before each MRP run is to have the inventory parameter “Low Level On-line” enabled which causes the system to adjust low level codes on-line as BOMs are copied and maintained. If both processors have been run at some point without errors and this flag is enabled, your low level codes should not be the problem. If you are relying on this parameter to maintain your codes, it may be worthwhile to run both processors before the next run to see if they fix the problem.

2) People are using the system while MRP is running.

Although it is not always feasible, the MRP Generation is designed to be run when no users are in the database. If there are users working in the manufacturing modules while MRP is running, there is a strong chance you will receive this error. If MRP plans an item (changing its flag to no) and then a transaction is processed or an order entered for that item while MRP is still running, the item’s flag will be flipped to yes which will result in the error at the end of the generation. In this situation, there really is no problem which needs addressed other than perhaps a procedural change to assure no one is using the system while MRP is running.

3) Invalid cross references.

If you have what MRP determines to be an invalid cross reference, it will generate and error and skip the next item before changing the item’s net change flag to no. Therefore, the item with the invalid cross reference will generate the low level code error. If MRP is being run in the background queue, the error will be written to the MRP error file (mrp.err). If being run in the foreground, the error will appear on screen. This problem cross references must be manually cleaned up in order to prevent this error.

Cross references can be created between CO line items and jobs, job materials and subjobs, or job materials and PO line items and must be a one-to-one relationship. If one record points to another which is not linked back or if multiple records point to the same record the system considers that an invalid cross reference. Examples would be if a CO line item is referenced to a job which is not referenced to the CO line or multiple job materials all referenced to the same PO line item.

4) An item is missing the inventory default warehouse.

Every item in the item master file should have and item warehouse record (itemwhse) for the warehouse that is defined as your default warehouse in the inventory parameters (typically MAIN). SYMIX always expects that record to be there. If the “Whse Considered For” MRP parameter is set to “Single” and an item is missing this record, MRP will skip the item without resetting its net change flag. To check for this condition, you can run the following program from the Progress query editor:

find symix.parms 0.
for each symix.item no-lock where item.item <> “”:
find itemwhse where itemwhse.item = item.item
and itemwhse.whse = parms.def-whse no-lock no-error.
if not available itemwhse then
display item.item item.change-date.
end.

If any items are missing this record, it can be created by running the “Item Stockroom Loc Mass Create” utility on the inventory Warehouse Transfer Utilities menu.

5) The BOM processor(s) failed without error due to incorrectly imported data.

Like item 1 above, this may result in incorrect low level codes but it is really a different problem. If you have imported data such as item master records, current routing and BOMS, jobs, job routings and job BOMs and all of the files and fields have not been populated appropriately, both processors may complete with no error messages but your low level codes may still be inaccurate.

One past example of this was imported actual jobs that did not have the “Finish Job” field populated. The Job BOM processor gave no errors but did not work since it counts on that field being set for identifying top level jobs.

6) Low level code are incorrect due to bugs 19385 or 19387

These are two bugs that ONLY EXIST IN VERSION SL3b00. The problem defined by bug 19387 is that the low level codes are not set properly when you add materials to a current or job BOM if the “Low Level On-Line” inventory parameter is enabled. The workaround is to run the Current BOM Processor and Job BOM Processor before each MRP run.

The problem described in bug 19385 is that the Job BOM Processor may not adjust your low level codes correctly if there are manufactured items used in job BOMs at lower levels than they are used in any current BOMs. The true cause of the problem is that the inventory module is leaving the status field blank in the current job it creates when you create a current routing for an item. It should be (F)irm. The workaround is to run the following program to populate that field and then run both processors.

for each symix.job where job.type = “S”:
job.stat = “F”.
end.
If none of these prove to be the source of the problem, the first step should be check the background queue log file, MRP error file, and the database log file. If there was a Progress error generated due to missing or corrupt data, it will appear in one of these files.

If no errors are found, the next step would be to run the “Items with Net Change Flag” report immediately after MRP finishes. Any items for which the net change flag is yes will appear on the report. You should then examine the data structures in the system for those items. For example, run a “Single Level Where Used” report for the item and verify its low level code is higher than all its parent items’ codes.

It is imperative that the report is run after MRP finishes but before any users begin using the system since there activities will likely turn on the net change flag for items making it impossible to know which items generated the low level code error. If running MRP in the background, you can set up this report to also run in the background after MRP.

Categories: Application Tags: , ,